
Game Detail : Wayward
Welcome to Wayward Guide,
Wayward game is not an easy game. It's complicated and need to learn several things before experienced. Wayward is a survival game, that mean at any cost you need to thinking about your hero condition and surrounding to make sure you are safe from dangerous things such as monsters.
InventoryPress "I" button on keyboard for shortcut
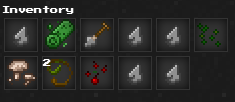
Each tile has a limited amount of items (12) that can be on it. If you are standing in front of a container (like a chest), items will be dropped inside automatically. Containers are limited only by weight (75 for Wooden Chest), not amount of items. Unfortunately, right-clicking doesn’t allow you to move items into portable containers (like a Backpack); you have to drag and drop manually, one by one. For retrieving items from a container, the right mouse button does work.
CraftingPress "C" button on keyboard for shortcut
The rest of the inventory window is dedicated to crafting. This contains all of the recipes you have found so far and grows bigger over time. Recipes that can be currently crafted from items you have in your inventory are highlighted. Hovering over recipe also highlights the items in your inventory contained in that recipe. If you are missing one or more ingredients, the recipe is darkened, but you can hover your cursor above it to display the requirements and see what is missing. The missing ingredients are highlighted in red.

Where to find recipes
You learn them. Once you have all of the required items in your inventory, the new recipe appears. Sometimes you can learn a recipe just by crafting similar items. Some monsters drop an Old Instructional Scroll that contains one random recipe, although it can also be found in house structures. So if you get stuck and don’t want to peek at the wiki for the recipe, you can try hunting some monsters to get this scroll, or just try crafting similar items. If you have crafted an item once, you will remember its recipe forever. There is no mechanism to forget.
Crafting is done one item at a time by left-clicking the item’s icon in the crafting menu. Also, every crafting costs you Stamina, which is calculated from the weight of crafted item (small items under weight of 1.0 are crafted without stamina loss). Be careful not to click too fast, because the list of recipes tends to shift around as some recipes become available or unavailable, so make sure before you click that it’s still the same item you want.
Crafting is done one item at a time by left-clicking the item’s icon in the crafting menu. Also, every crafting costs you Stamina, which is calculated from the weight of crafted item (small items under weight of 1.0 are crafted without stamina loss). Be careful not to click too fast, because the list of recipes tends to shift around as some recipes become available or unavailable, so make sure before you click that it’s still the same item you want.
EquipmentPress "E" button on keyboard for shortcut
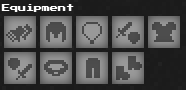
On top of the inventory window, you can see a small space for your equipment. Hovering your cursor over the icons shows type of slot. You can equip items by dragging them from your inventory to their respective slots. You have to be precise when placing your equipment. There is no automatic mechanism that places equipment where it belongs. To take something off you can right-click your mouse on its slot.
Note that you have two hands, each of which can hold separate equipment. You are right-handed and, as a result, the item in your right hand is damaged before whatever you have in your left hand. In other words, your right hand is usually for weapon and your left hand can carry torch or shield without worrying about destroying them. More on thishere.
Hotbar
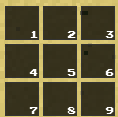
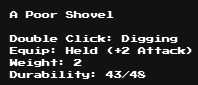
You can drag tools that have double-click functions from the inventory to these slots. For example, the shovel has a “Digging” action that can be performed from the inventory window by double-clicking on the shovel. Drag it to slot 1 and now you can just hit the [1] key on your keyboard and you will dig.
Note that items are moved to the hotbar physically, not just for reference. This does matter especially for crafting, because items from the hotbar are not taken into account for recipes. For example, the hammer has the “Repair” function activated by double click. The hammer can also be used as an equipped weapon. The hammer is also part of some recipes (although not consumed). So, to cover all three situations, you would need three hammers or you would need to move your single hammer around depending on what you want to do.
Minimap
The minimap is displayed in the lower-right corner. It shows area of 38 tiles × 38 tiles with you in the middle. However, don’t expect anything else from this. No moving around, resize or clicking. Also it doesn’t display enemies or any items lying on the ground. Once you craft yourself a Spyglass, you can peek to the distance for another 38 tiles in the direction you are facing.
Beginning
As the game is randomly generated every time you start new one, it’s hard to establish exact tactics because it heavily depends on what you have available. Starting equipment is randomly generated as well, but you can be sure to get one Waterskin; a Leaf Bedroll; a Sharp Rock and 6 – 10 other items from the group like food, more rocks, or valuable String.
Do quick run around your starting island. You can find some basic resources just lying on the ground. Usually, you will need to dig them out with a Shovel; just face the tile with it and double-click on the Shovel in your inventory. Some items can be found lying on the ground, and you have to step on the tile to pick them up.
How to survive
Quenching your thirst should be the first priority. Some naturally occurring foodstuffs are good for this. Long term you should be looking into crafting something useful with glass or stone and . It’s important to know that nastier monsters spawn as you get more skilled. So one tactic is to concentrate on building up your fighting skills, and weapons and armor, while trying not to learn much else. Pretty much like a bad public school, really.
Quenching your thirst should be the first priority. Some naturally occurring foodstuffs are good for this. Long term you should be looking into crafting something useful with glass or stone and . It’s important to know that nastier monsters spawn as you get more skilled. So one tactic is to concentrate on building up your fighting skills, and weapons and armor, while trying not to learn much else. Pretty much like a bad public school, really.
How to Collect a Tree
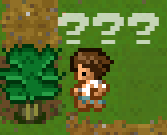
That causes much confusion for most new players because it’s very slow to get something from the tree at the beginning. Keep in mind: you start with a low Lumberjack skill and next-to-nothing attack value, so don’t expect anything useful to fall into your lap right away. After all, we are surviving here!
Find a suitable tree (with leaves still on it), face it, and start ramming into it like you want go forward. This is how gathering is done. Overall success is driven by associated skills (Lumberjacking for tree-cutting), which is also increased by using that skill. However, you definitely want to use some tool to protect yourself from injury since you are not some kind of warrior-monk who can split a tree in half with your fist.
How to get Axe
You would probably expect that for efficient cutting of trees you would need an axe. Normally it would be logical, but here in Wayward it’s not the case. It actually doesn’t really matter what tool you have. You can use simple wooden pole just to remove injury during work. Just place the tool into your right hand slot in equipment panel, and you are good to go.
The only thing that really matters is the attack value of your tool. That measures how many items you can eventually get from one gathering action, not the success of the action. Actually you can even use starting Shovel and start bashing tree with it without any trouble. Result will be mostly the same as they would be with your bare hands, only without injury. However, once you have gathered some resources, make yourself a Spear. It has attack value of 4, which means you can get up to 2 items from one hit of the tree. That speeds up things a bit.
How to Repair Tools

Yeah, it happens in Wayward very often, especially with wooden tools. You can repair things (unless you managed to completely destroy them), but it’s far from permanent solution, especially with low skill. Maximum durability of repaired item will gradually decrease, and eventually it becomes un-repairable. Also, the game mechanics of repairing are not very friendly in the current version. Note that with a higher skill, you can craft more durable versions of basic tools.
To repair items, you need an item with the Repair action. This could be a Hammer or a Grindstone, depending on whether you have regular stone or sandstone nearby. Next, you need to drop the almost-broken item on the ground in front of you (right click on the item in inventory window), then use the Repair tool and watch the message box in top left corner closely. With a low skill, you will have to repeat couple of times. Afterwards, you can pick up the item and equip it again. Note: The repair rate will depend on the skill associated with item being repaired.
Fighting Monsters
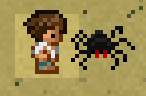
Don’t freak out once you spot monster that is following you. Keep in mind that you are controlling time in the world. You can plan every step you make. You can even run away from most enemies because they sometimes stumble into obstacles, and before they realize it, you are long gone.
Don’t worry too much about monsters like Spiders or Rats. They may seem tough, but you have quite a lot of health points and healing is not too complicated. I would probably avoid Bears for the first day. On other hand, if you spot Chickens, Small Rats, or Rabbits, try to hunt them and corner them. These are easy prey to kill and they give you food to aid your survival.
I highly recommend that you craft yourself a complete set of Bark Armor as soon as possible to give you basic protection. A Spear is probably the best weapon at the start, which you can easily afford to make. Also, have some spare weapons in your inventory in case the one in your hand brakes. Remember that crafting costs you turns too, so you’d better be ready now than sorry later. Use the time to your advantage and wait for critters to come at you. That way, you can strike first, not the opposite. You can also use Stones and try to throw some at enemy, but don’t expect much with a low Throwing skill.
After each successful kill, don’t forget to carve the corpse. You can do that simply with a Sharp Rock or Sharp Glass (made by putting Sand in a lit Campfire). Face the tile with corpse and double-click on a tool with the Carve function; repeat until the corpse disappears. Finally, step on the tile and pick up everything by hitting the [Spacebar] key few times. Some products are obviously useful, but all take further preparation.
Recover Stamina

Stamina measures your energy reservoir, and you can get hurt a bit if you do work while exhausted. It slowly regenerates when you are not performing tiring actions like hitting a tree. It’s regenerated even by walking around or simply standing on the spot and pushing or holding [Spacebar] key. Your stamina increases roughly every 5th turn.
To get better faster, you should rest using the Bedroll you got as starting equipment. Simply double-click on it or use it from your hotbar. You will rest for some number of turns, the minimum being 50 turns (300 at night). The number of turns slept increases with the Camping skill and unfortunately cannot be controlled in any way. Once your Camping skill is over 20% you will rest for 500 turns (750 in the night) at maximum. The only thing that can wake you prematurely is some monster drooling on your cheek or health loss (when you are bleeding or hungry). It doesn’t matter if your Stamina is already full, it will not wake you.
You might think that for good rest you need to be warm, so you might want to start the fire. The thing is, fire doesn’t boost your sleep result in any way. Fire provides light which is good thing to have for night and you can cook your food on it. But that’s it. So for quick rest during the day, don’t bother with fire as it is not helping in any way.
Recover Hunger
Then you should eat something. Wayward has actually quite big menu of food to offer. You can eat some mushrooms, fungus from the tree, berries, earthworm or dead spider. Of course, these are not yummiest, but it will do when you’re starving. However, once you have killed some critters for meat, it gets better. I highly recommend you to make yourself some fire and cook the meat to make it even more nutritious.
 You might wonder how to make fire. For starters, you will need Hand Drill or Fire Plough. If you’ve been cutting trees, I am sure you have recipe for one these already. Now you can simply set any Grass tile on fire and burn anything on it (good for garbage) by double-clicking on one of these tools. Or you can set on fire any tree. However, in these cases, be aware that fire can and will spread. To extinguish it you have to pour water on it or if its a fire in grass you can dump sand, gravel or dirt on it. If you want a fire that’s under control, make yourself Campfire.
To cook food, simply face the fire and use the crafting recipe that is available for you. If you don’t see any, you don’t have any food that can be cooked.
Night Come
It’s time to find some shelter for the night. Any enclosed area will do, since you will not encounter any enemies that can go over or through obstacles. I recommend you to make yourself wooden door and place them in open spots. Also make sure you have at least two exits. Monsters tend to stand in front of your door and wait till you wake up. Make yourself one or two wooden chests and tidy up your inventory. Now you can lay down on your Bedroll and sleep through the night. Watch your hunger between wake-ups (roughly each 300 turns) and eventually feed your campfire to keep your shelter well lit.
If you are feeling adventurous, you can find some cave entrance and spend the night mining. Caves are always dark, so it doesn’t really matter what time it is outside. Sure, some critters can appear, but it should not be too hard. You can always run to the exit for safety. Make yourself a supply of stones and possibly find some Iron Ore, Talc or Limestone.
Resource : Wayward
Don't forget to share on this below,
we really appreciate your support :
we really appreciate your support :
0 komentar :
Post a Comment